PrestaShop 1.7 · 8 · 9
Express Checkout: User guide
Install the module, set it up for your shop, and understand every option and every number it shows you.
- Module version
- 1.1.0
- Works with
- PrestaShop 1.7, 8 and 9
- Last updated
Contents
1Introduction
What Express Checkout does
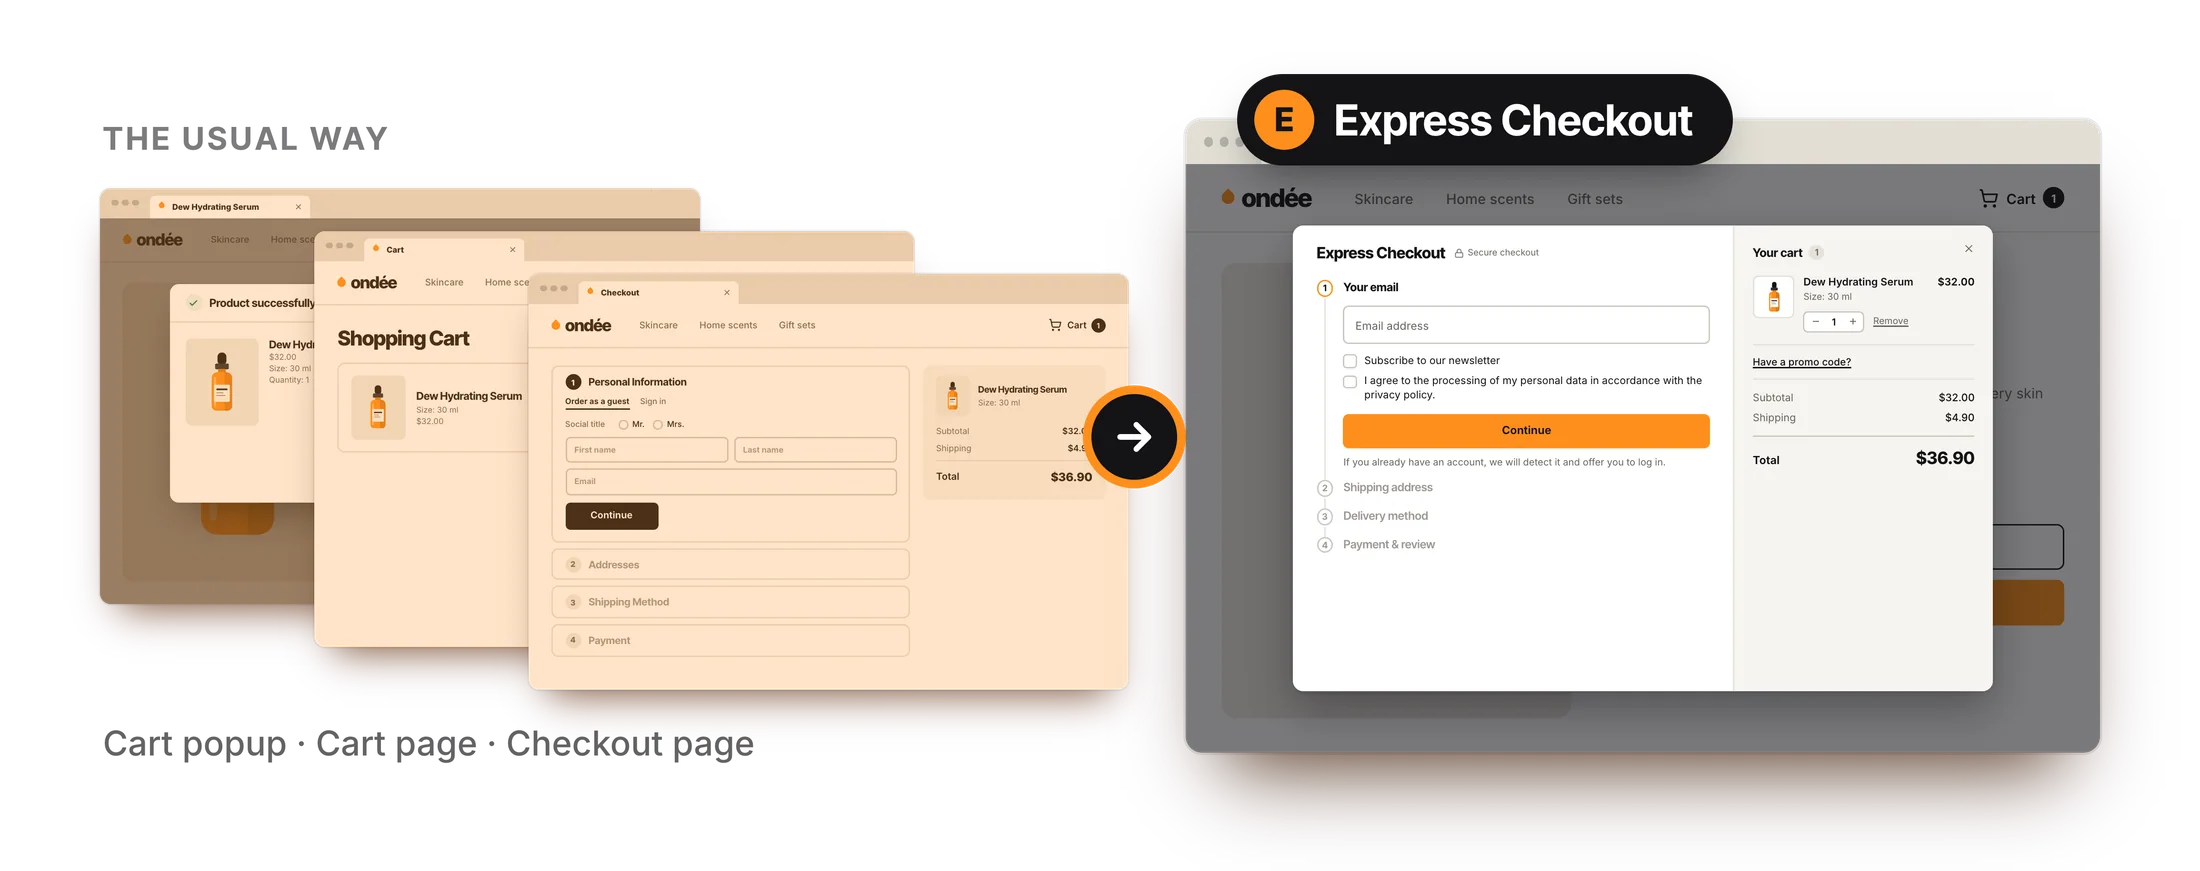
Express Checkout adds a button to your product pages. One click opens the whole checkout in a window on that same page: email, address, delivery and payment, without a trip through the cart page and the checkout page.
1.1 In short
On a standard PrestaShop shop, a customer who wants one product goes through the cart popup, the cart page and the checkout page before paying. Each page is a moment where they can leave. Express Checkout shortens that road: the product goes into the cart and the checkout opens right there, in four short steps, with the cart beside them.
The module does not replace your shop's checkout. Your cart page and your checkout page keep working exactly as before, and customers can still use them. Express Checkout is a faster way in, and it uses what your shop already has: your carriers, your payment modules, your customers' accounts and addresses, your vouchers and your terms of service.
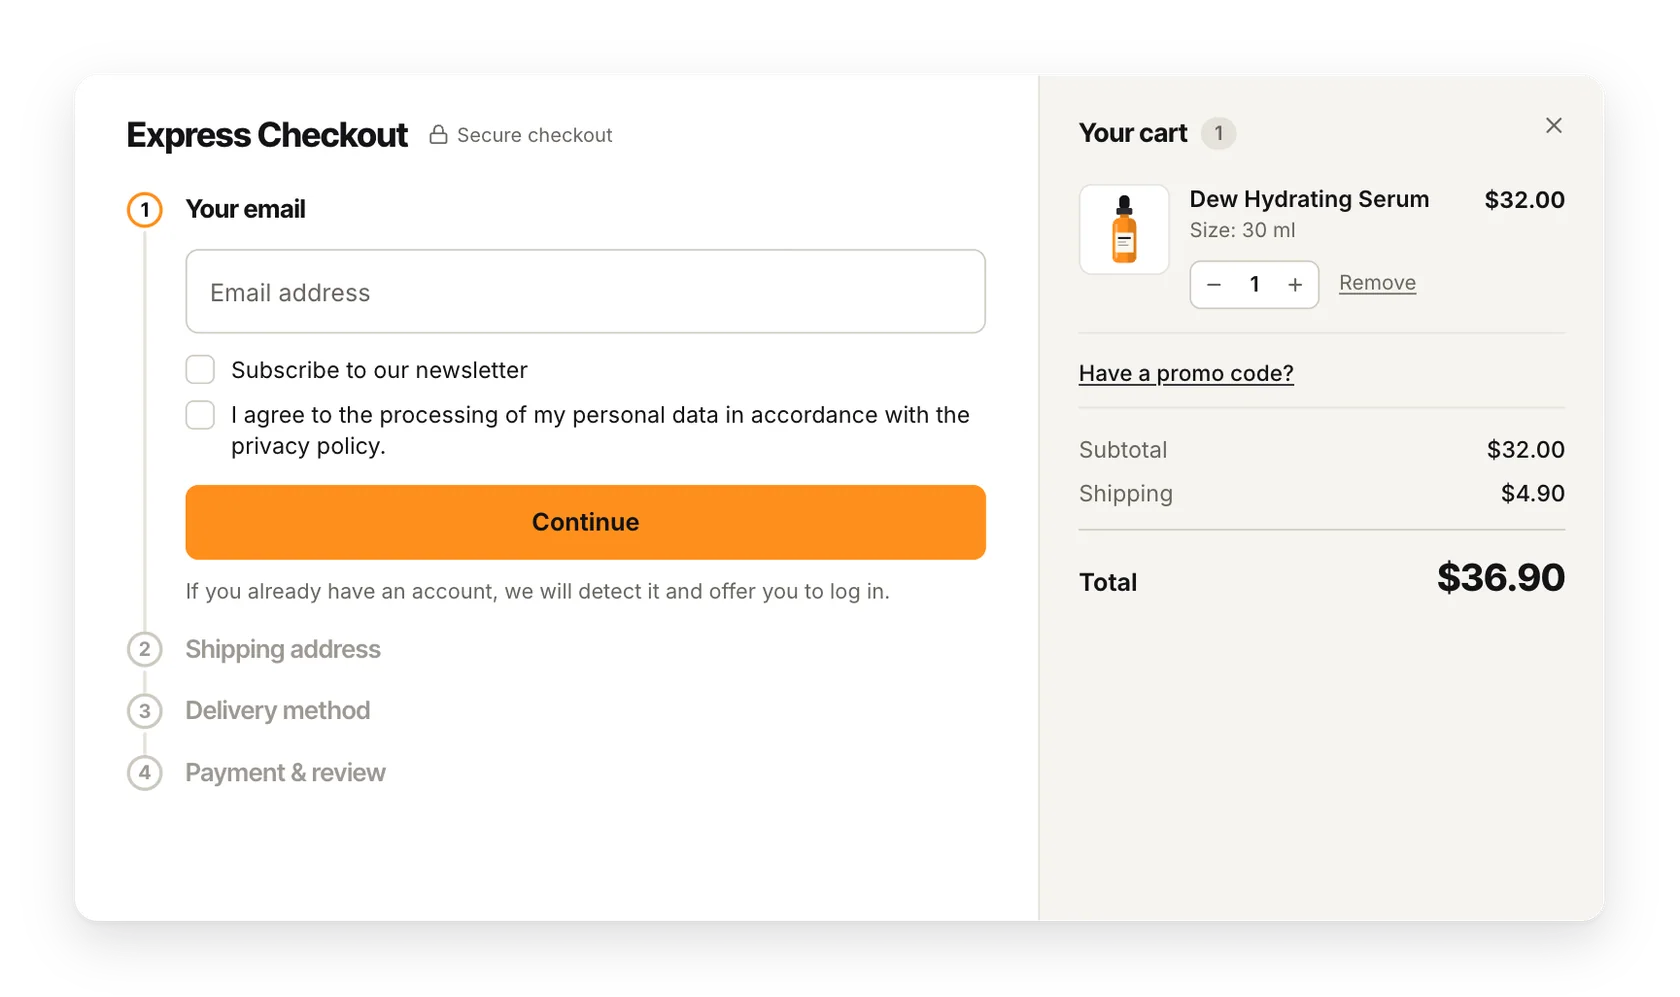
- 1Your emailGuests need only an email. An existing account is spotted and the customer logs in on the spot.
- 2Shipping addressThe right fields for each country, or a saved address for returning customers.
- 3Delivery methodYour shop's carriers, with their prices and delivery times.
- 4Payment & reviewYour payment modules, your terms, and one button with the total.
1.2 What you get
#quickcheckout, or from any button of your theme.1.3 Requirements
| PrestaShop | Version 1.7, 8 or 9. |
| Theme | Any theme that shows PrestaShop's standard product page positions. For other themes the button can be placed by hand (see Buy now button). |
| Languages | The module comes translated into several languages, and more are added over time. Any other language can be added with PrestaShop's translation tool. |
| Multistore | Supported. Each shop has its own settings, design and statistics. |
| Payment | At least one payment module installed and working on your normal checkout. |
2Installation
Install and get started
The module works right after installation, with sensible defaults. This chapter covers installing, finding the configuration, and what to do if you would rather test in private first.
2.1 Install the module
- Download the moduleGet the module's
.zipfile from your PrestaShop Addons account. Do not unzip it. - Open the Module ManagerIn your back office, go to Modules > Module Manager.
- Upload the fileClick Upload a module and choose the
.zipfile, or drop it into the upload box. PrestaShop installs it for you. - Open the configurationWhen the installation is done, click Configure.
2.2 What you get right after installation
You do not have to configure anything for the module to work. After installation:
- The Express Checkout button appears on every product page, in the "Product Additional Info" position, which most themes show right under Add to cart.
- Live mode is on: every visitor sees the button and can use the window.
- Step 1 shows the privacy consent box (required) and the newsletter box (optional). The partner offers box is off.
- Links that end with
#quickcheckoutopen the window with the current cart. Opening it from the cart icon is off. - The window uses the built-in look: a dark "Ink" accent, 940 px wide.
- Statistics are collected from the first checkout.
2.3 Where to find the module
There are two ways to open the configuration:
- From the menu. The module adds an Express Checkout entry under HiPresta in the left menu of your back office, with three links: Settings, Design and Statistics.
- From the Module Manager. Go to Modules > Module Manager, find "Express Checkout" and click Configure.
Both open the same page, with three tabs at the top: General Settings, Design Settings and Statistics.
2.4 The configuration page

- General Settings
- Design Settings
- Statistics
A few things work the same way on every tab:
- Saving. As soon as you change something, a bar appears at the bottom of the page with Save and Discard. Nothing changes on your shop until you save. You can also save with Ctrl + S (Cmd + S on a Mac).
- Unsaved changes. If you switch tabs or leave the page with unsaved changes, the module asks you to confirm first.
- Help on every setting. Each setting has a small ? icon. Click it and a panel opens at the side with an explanation of that setting.
- The module's menu. The button with three dots at the right of the module's bar opens a small menu: Version shows the changelog, Leave a review opens the rating page on PrestaShop Addons, and Contact us opens the support form. Below them is a list of other HiPresta modules.
2.5 If you run several shops (multistore)
Choose one shop in the shop selector at the top of the back office before opening the configuration. With "All shops" or a shop group selected, the module shows the message "Please select a specific shop to configure this module."
Settings, design and statistics are saved for the shop you are editing; a line at the top of the General Settings and Design tabs reminds you which one. The only exception is Clean data on uninstall, which is shared by all shops because uninstalling removes the module from every shop.
2.6 Uninstalling
Uninstall the module from the Module Manager like any other module. What happens to its data depends on Clean data on uninstall (General Settings, last section):
- Off (default). Your settings and your statistics stay in the database. If you install the module again later, you find them as you left them.
- On. The module's settings and its statistics are deleted for good.
In both cases your orders, customers and carts are not touched.
3Quick start
Ready in five minutes
The shortest road from a fresh installation to a checkout you have tried yourself and are happy to show your customers.
3.1 Test before you go live
- Switch live mode offOpen General Settings. In the Availability section, turn Live mode off. The list of allowed IP addresses appears.
- Add your IP addressClick Add my IP. Your current address is added to the list. Click Save. From now on only you see the Express Checkout button.
- Check the buttonOpen a product page of your shop. The Express Checkout button should be near Add to cart. If it is not where you want it, or not there at all, see Buy now button.
- Place a test orderClick the button and go through the four steps with each payment method you offer. Try it on a phone as well. Checkouts made while live mode is off are kept out of your statistics.
- Make it yoursOpen Design Settings and choose your accent color. Back in General Settings, decide which consent boxes to show.
- Go liveTurn Live mode back on and save. Every visitor now sees the button.
3.2 What to check during your test
| Check | What you should see |
|---|---|
| The button | On the product page, in the place you chose. A click opens the window, with the product in the cart. |
| A new email | Goes straight to the address step, with no password. |
| An email with an account | The window asks to log in, then shows the saved addresses. |
| Carriers | The delivery methods and prices your normal checkout shows for that address. |
| Each payment method | The order is placed and you land on your shop's confirmation page. |
| The order in the back office | A normal order, with its customer, address, carrier and payment. |
4The checkout
What your customers see
A walk through the checkout from the customer's side, so you know what happens at each step and can answer their questions.
4.1 The Express Checkout button
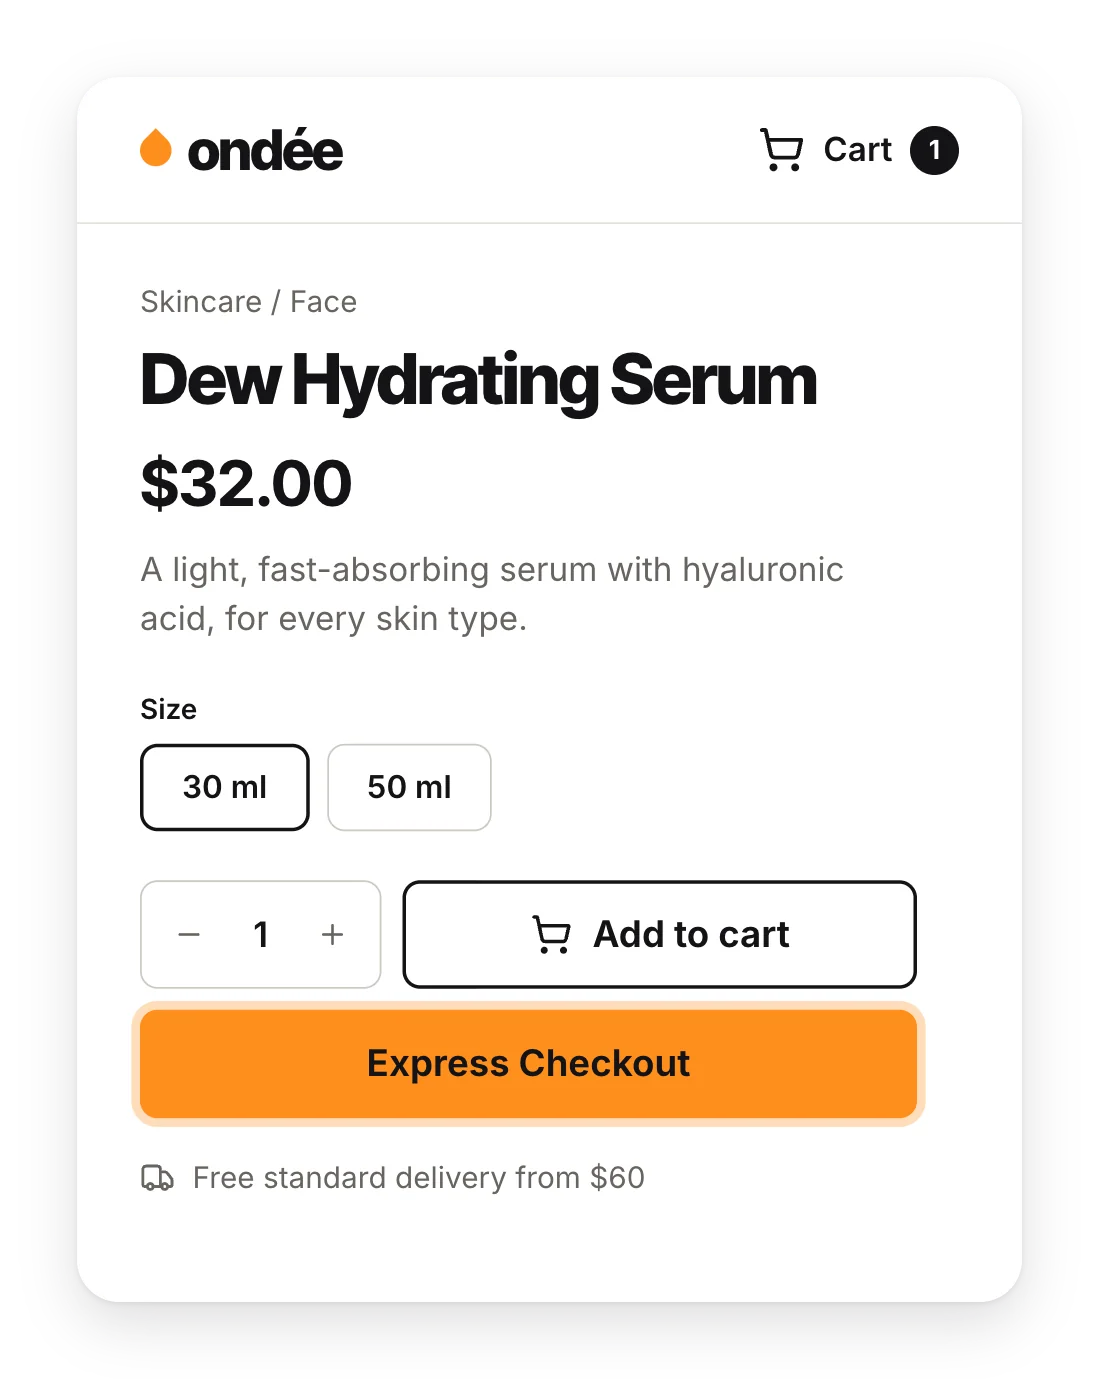
The button appears on product pages (Figure 1 shows it under Add to cart). When a customer clicks it:
- The product is added to their cart, with the combination (size, color…) and the quantity chosen on the page.
- The checkout window opens on top of the product page. The page behind it is dimmed.
The cart is the shop's normal cart. If the customer already had other products in it, they are part of this order too, and the cart column lists them all.
Stock is checked for you
- When a product cannot be ordered (out of stock with backorders refused, or not available for order), the button is greyed out and cannot be clicked. It follows the combination the customer picks.
- If the customer asks for more than you have, the module adds what is available and says so: "Only 3 item(s) added to cart. The requested quantity is not available in stock."
4.2 Other ways to open the checkout
Besides the product page button, the window can open with the customer's current cart, without adding a product:
- From a link that ends with
#quickcheckout, handy in a banner, a newsletter or a menu. - From any element of your theme that carries the CSS class
hiqc-open-quickcheckout, for example a "Checkout now" button. - From the cart icon in the header, in place of the cart page. This one is off until you switch it on.
All three are set up in Open triggers. If the cart is empty, the window says "Your cart is empty".
4.3 The checkout window
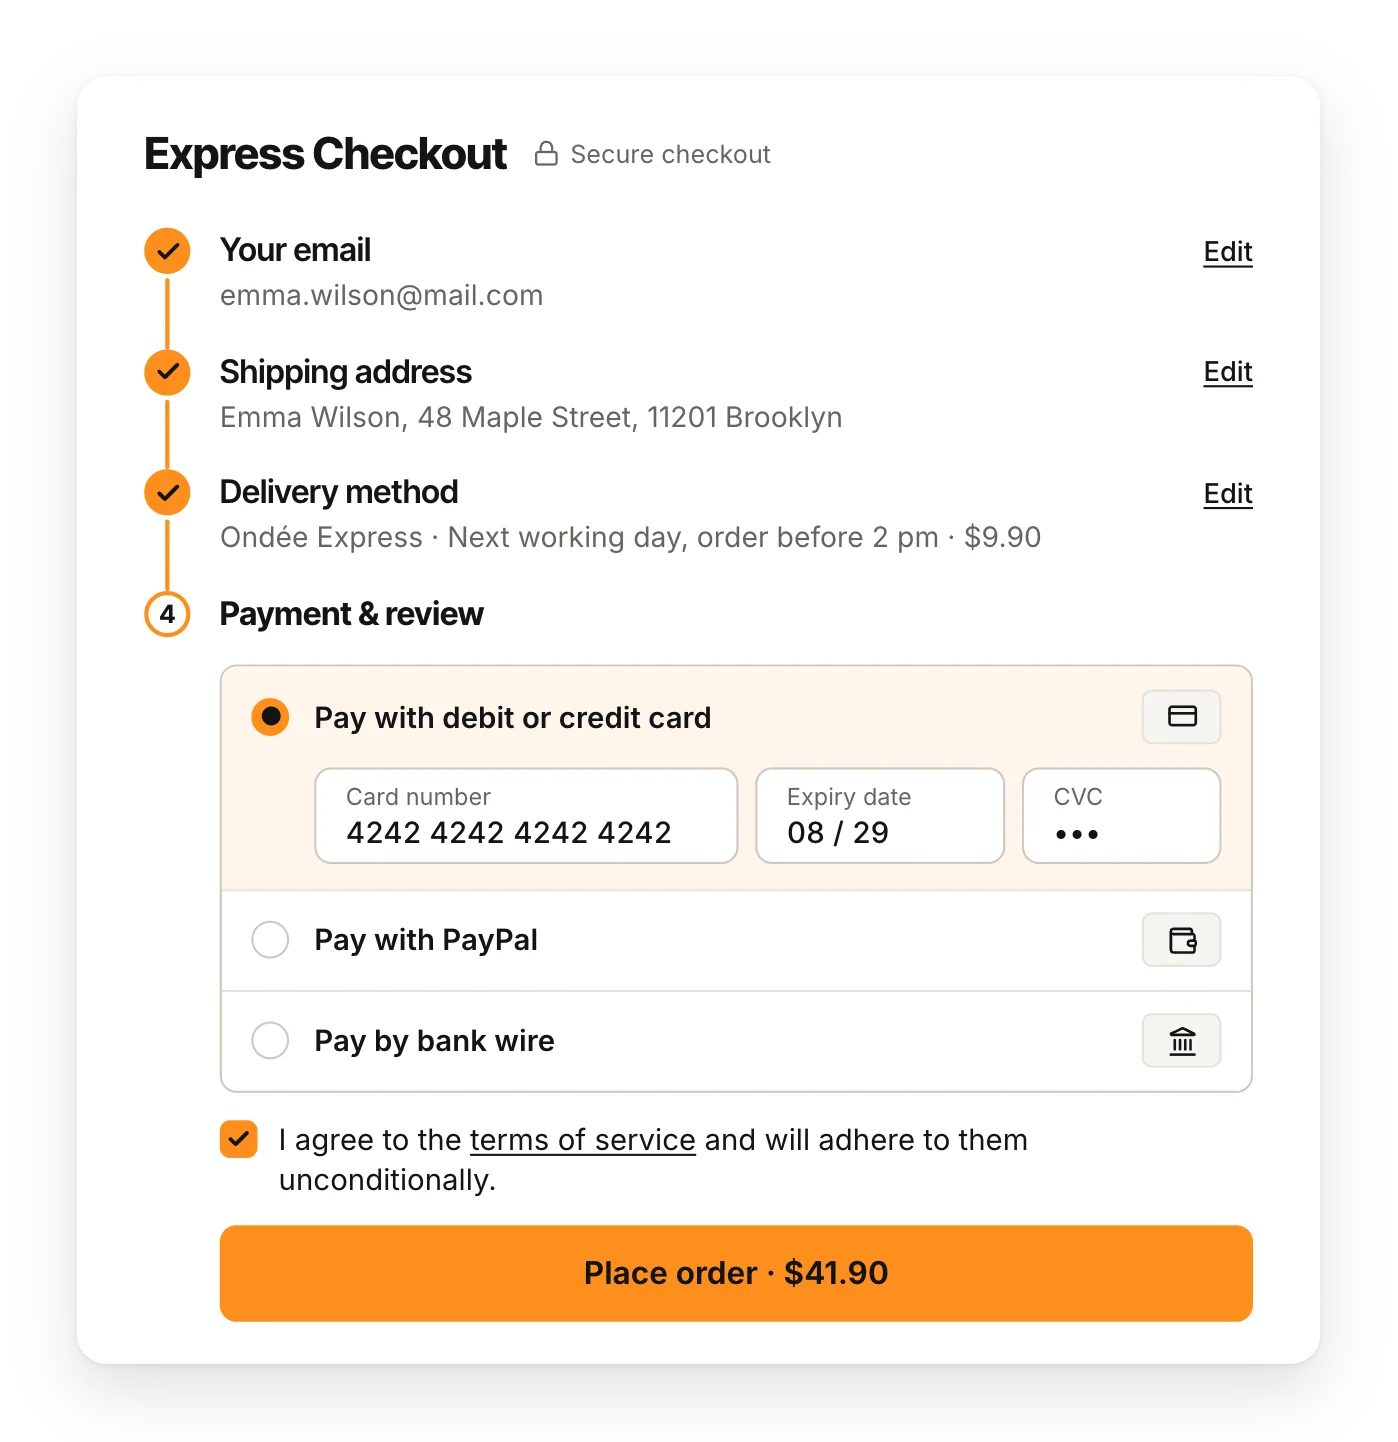
The window has two parts. On the left, the four steps, one open at a time. On the right, the cart with its totals. A finished step folds into one line (the email, the address, the carrier) with an Edit link to go back to it.
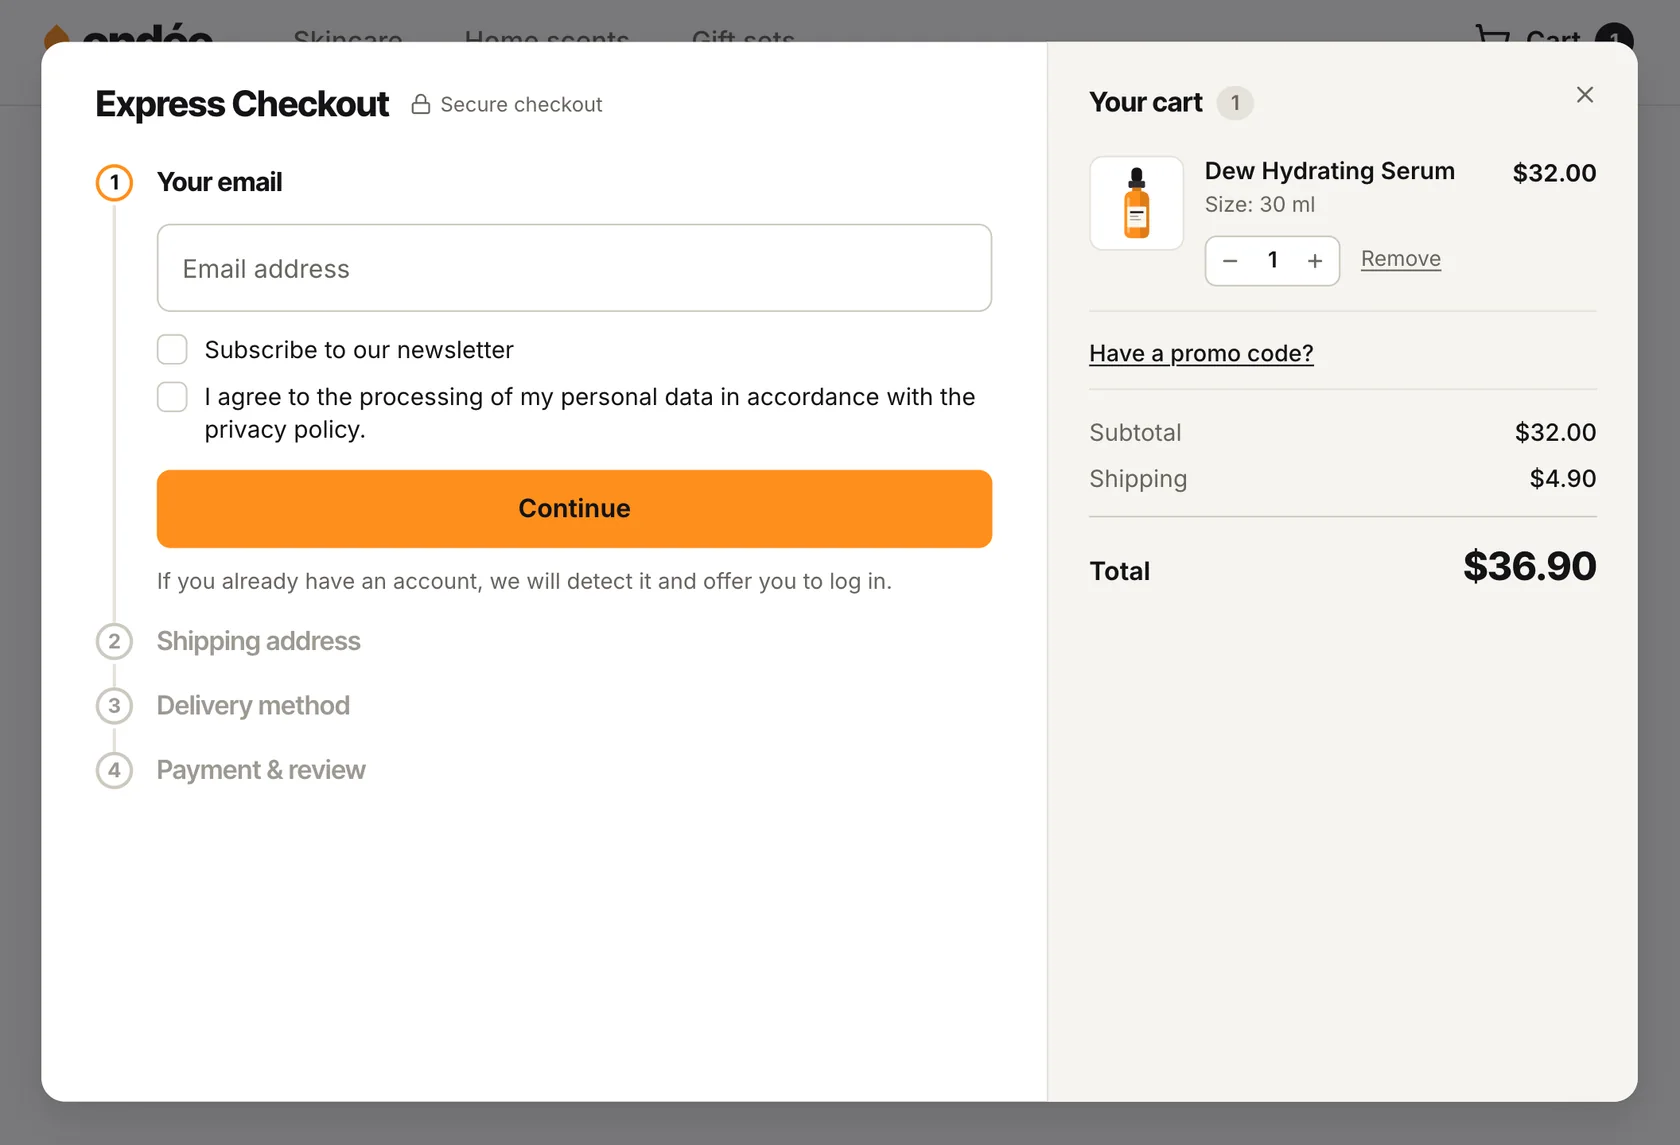
- Secure checkout. This label is shown next to the title when your shop runs on HTTPS.
- Closing. The customer closes the window with the cross, by clicking outside it, or with the Esc key. Nothing is lost: the products stay in the cart and the email is remembered for next time.
- Errors appear where they belong. A problem with a field is written under that field and disappears as soon as the customer corrects it.
- If something fails. When a request does not get through (a lost connection, for example), the window explains what happened and offers a Retry button.
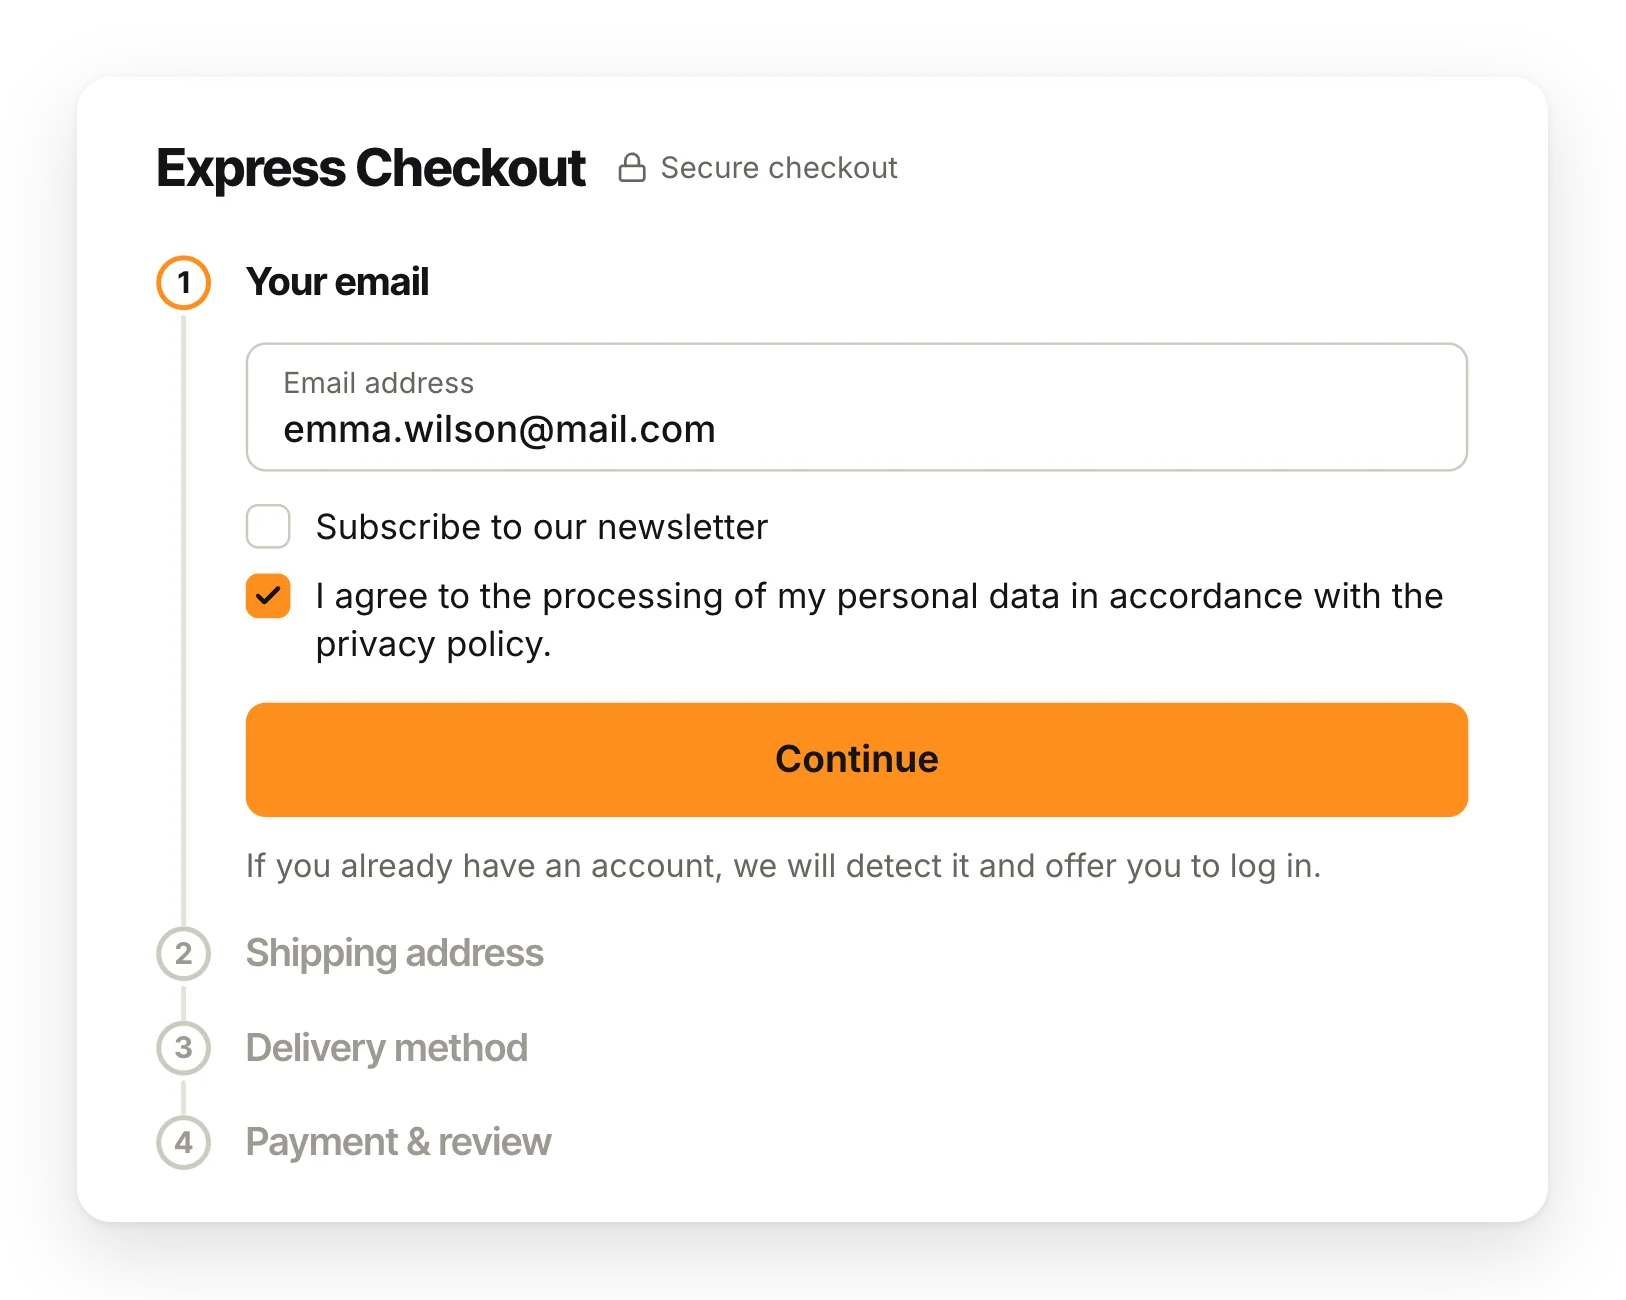
4.4 Step 1: Your email
A new customer types an email address and clicks Continue. That is all it takes to start: no account, no password. The order is placed as a guest order, with the name given at the address step.
Up to three checkboxes can be shown under the email. You choose which ones in Consent checkboxes:
- Subscribe to our newsletter (optional for the customer).
- Receive offers from our partners (optional for the customer).
- The privacy consent. When you show it, it must be ticked to continue.
When the email already has an account
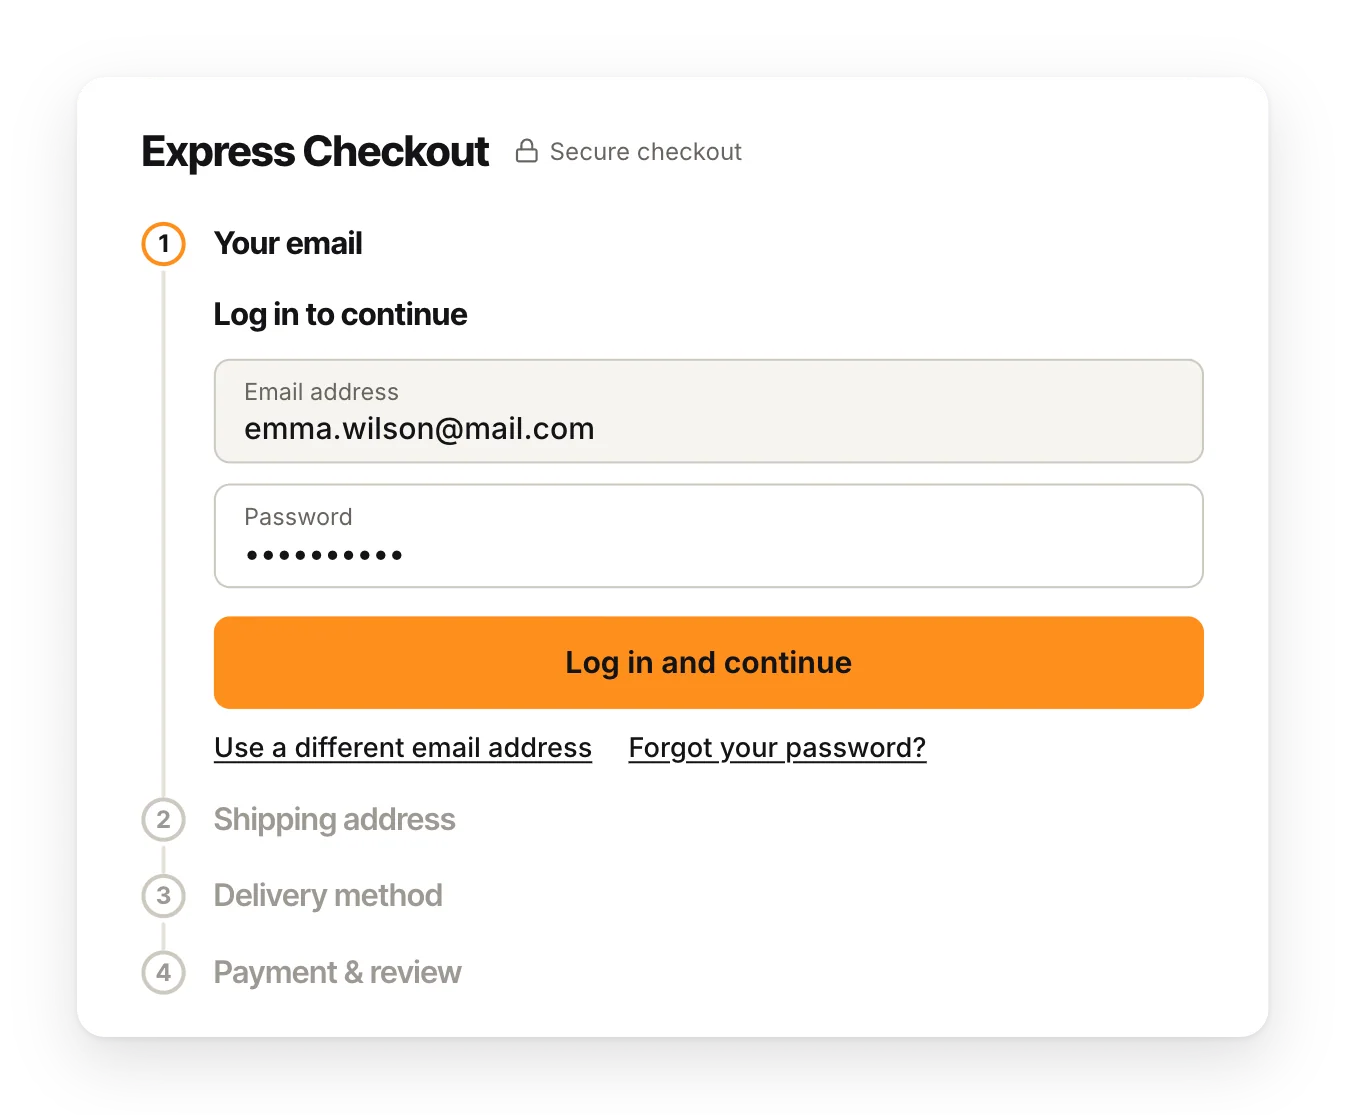
If the email belongs to an existing customer account, the window says so: "An account with this email already exists. Please log in to continue, or use a different email address."
The customer logs in right there, with their password, and continues with their saved addresses. Two links help them out:
- Use a different email address goes back to the email field.
- Forgot your password? opens your shop's password recovery page in a new tab.
Customers who are already logged in
They skip step 1 and start at the address step. If they go back to step 1, it shows "Connected as" with their name, the consent boxes, and a Log out link with a warning that logging out empties the cart.
4.5 Step 2: Shipping address
The address form is built from your PrestaShop settings, so it asks for what your shop needs and nothing else:
- Fields and their order follow the address format of the selected country. When the customer changes the country, the form adjusts.
- Required fields are the ones your shop requires. The others are marked "(optional)".
- Postcode. Required when the country needs one, and checked against the country's format, with a hint under the field ("Format: NNNNN").
- State. Shown only for countries that have states.
- Identification number. Required for the countries where PrestaShop asks for it.
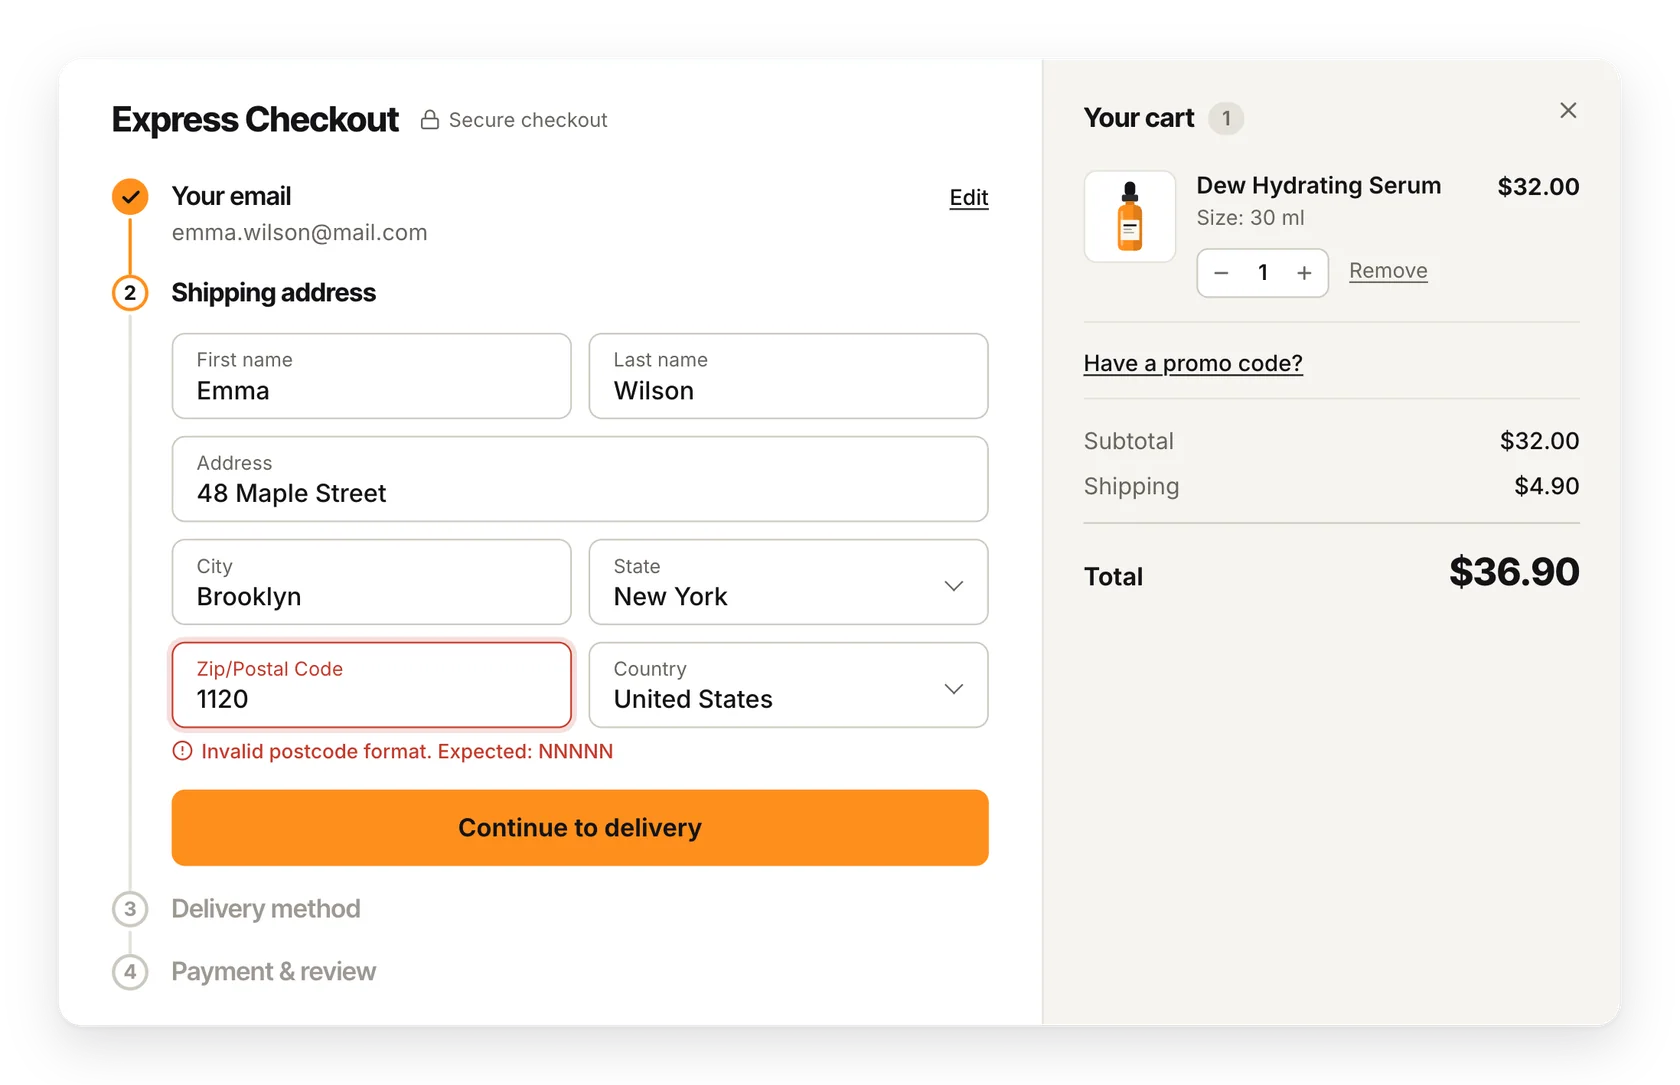
For a guest, this one address is used for both delivery and billing.
Saved addresses of returning customers
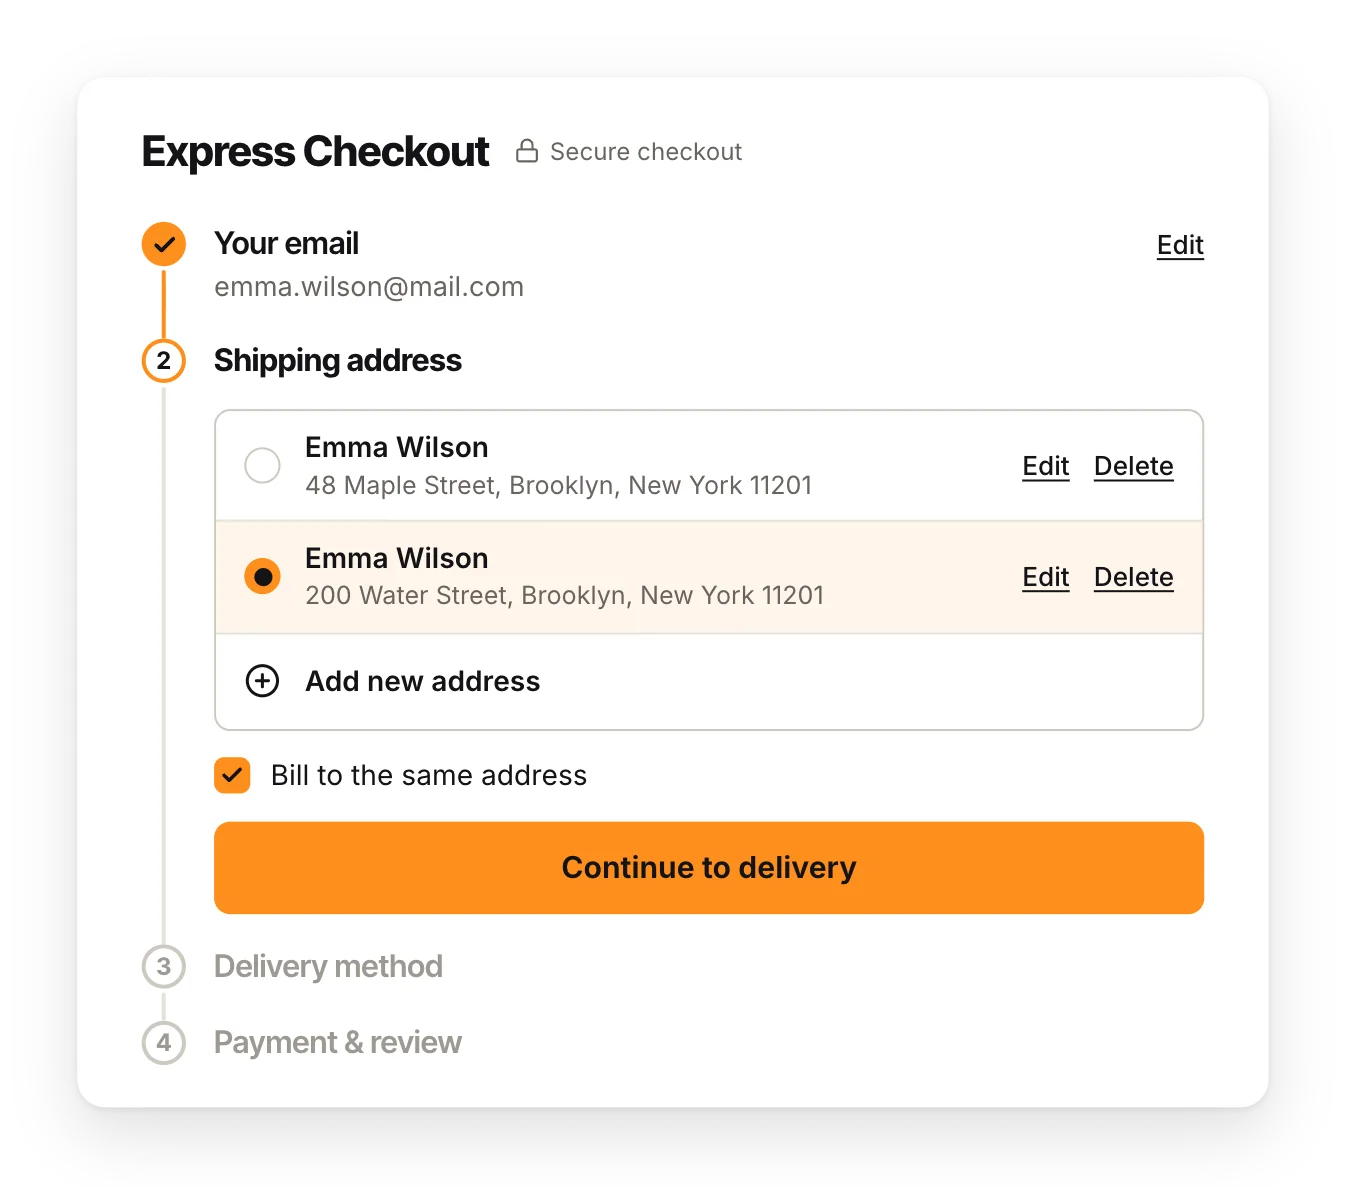
A logged-in customer who has addresses in their account sees them as a list and simply picks one. From the same list they can:
- Edit an address or Delete it (the window asks to confirm).
- Add new address, which opens the address form.
- Untick Bill to the same address to choose a different billing address from their saved addresses.
Addresses added or changed here are saved in the customer's account, like on the normal checkout.
4.6 Step 3: Delivery method
The customer sees the carriers your shop offers for their address, each with its logo, name, delivery time and price, and picks one. These are the same carriers, in the same conditions, as on your normal checkout: zones, price ranges, free shipping rules and so on are all yours.
- Carrier modules that need something more from the customer (for example the choice of a pickup point) show it under their option, and the customer cannot continue until it is complete.
- With Add a note to your order (optional) the customer can leave a message of up to 1000 characters. You find it with the order, like the comment of the normal checkout.
4.7 Step 4: Payment & review
The last step lists your shop's payment methods. Above it, the three finished steps sum up the order: email, address, carrier and its price.
- When the customer selects a payment method, its details open under it: the card fields, the PayPal button, or the instructions of the method.
- If your shop asks customers to accept the terms of service, the same checkbox is shown here. Its link opens the terms in a small window on top of the checkout.
- The button shows the amount to pay: Place order · $41.90.
After the click, the payment module takes over, exactly as on your normal checkout (see Payment methods). The customer then lands on your shop's order confirmation page, and you receive a normal order.
While the order is being placed, the window is locked so nothing can change by accident.
4.8 The cart, inside the window
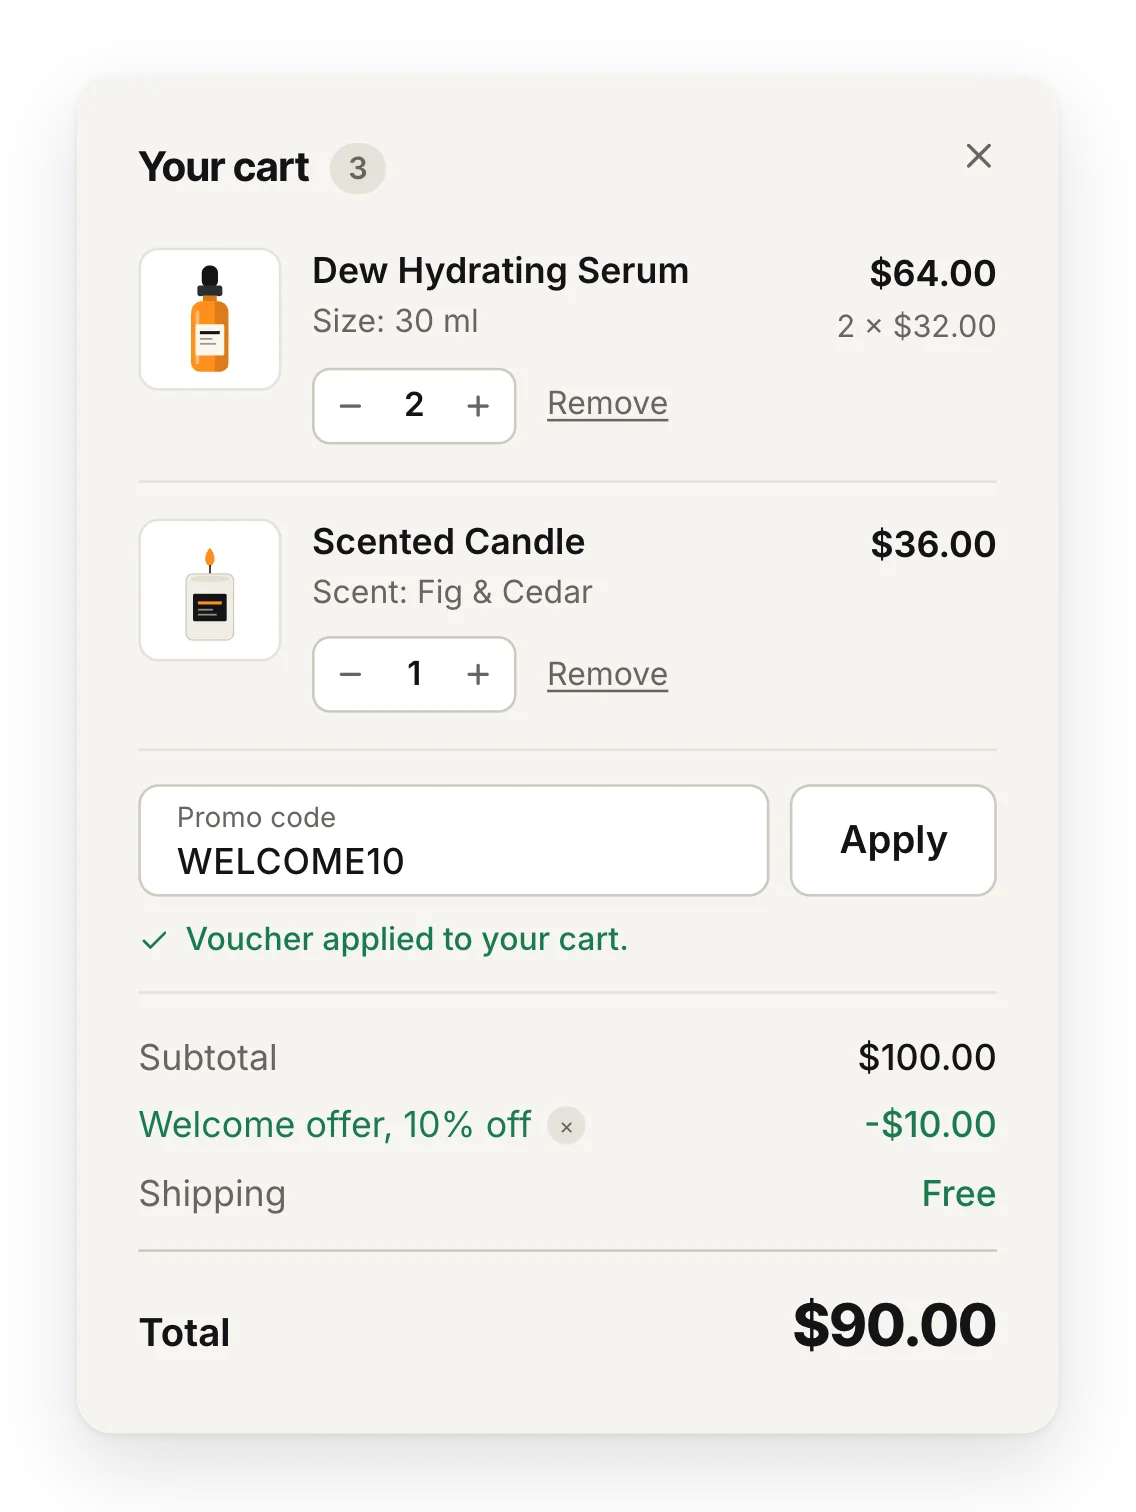
The right column is a working cart. During the email and address steps the customer can:
- Change a quantity with − and + or by typing a number. If they ask for more than is in stock, the quantity is set to the maximum and a message says so.
- Remove a product. Removing the last one shows "Your cart is empty".
- Click Have a promo code?, type a voucher code and click Apply. The discount appears as its own line and can be removed again.
The totals (subtotal, discounts, shipping, tax when it applies, total) are recalculated after every change. Free gifts added by a cart rule are shown as "Gift".
After the address step the cart is shown for review only. To change it, the customer goes back with an Edit link.
4.9 On phones
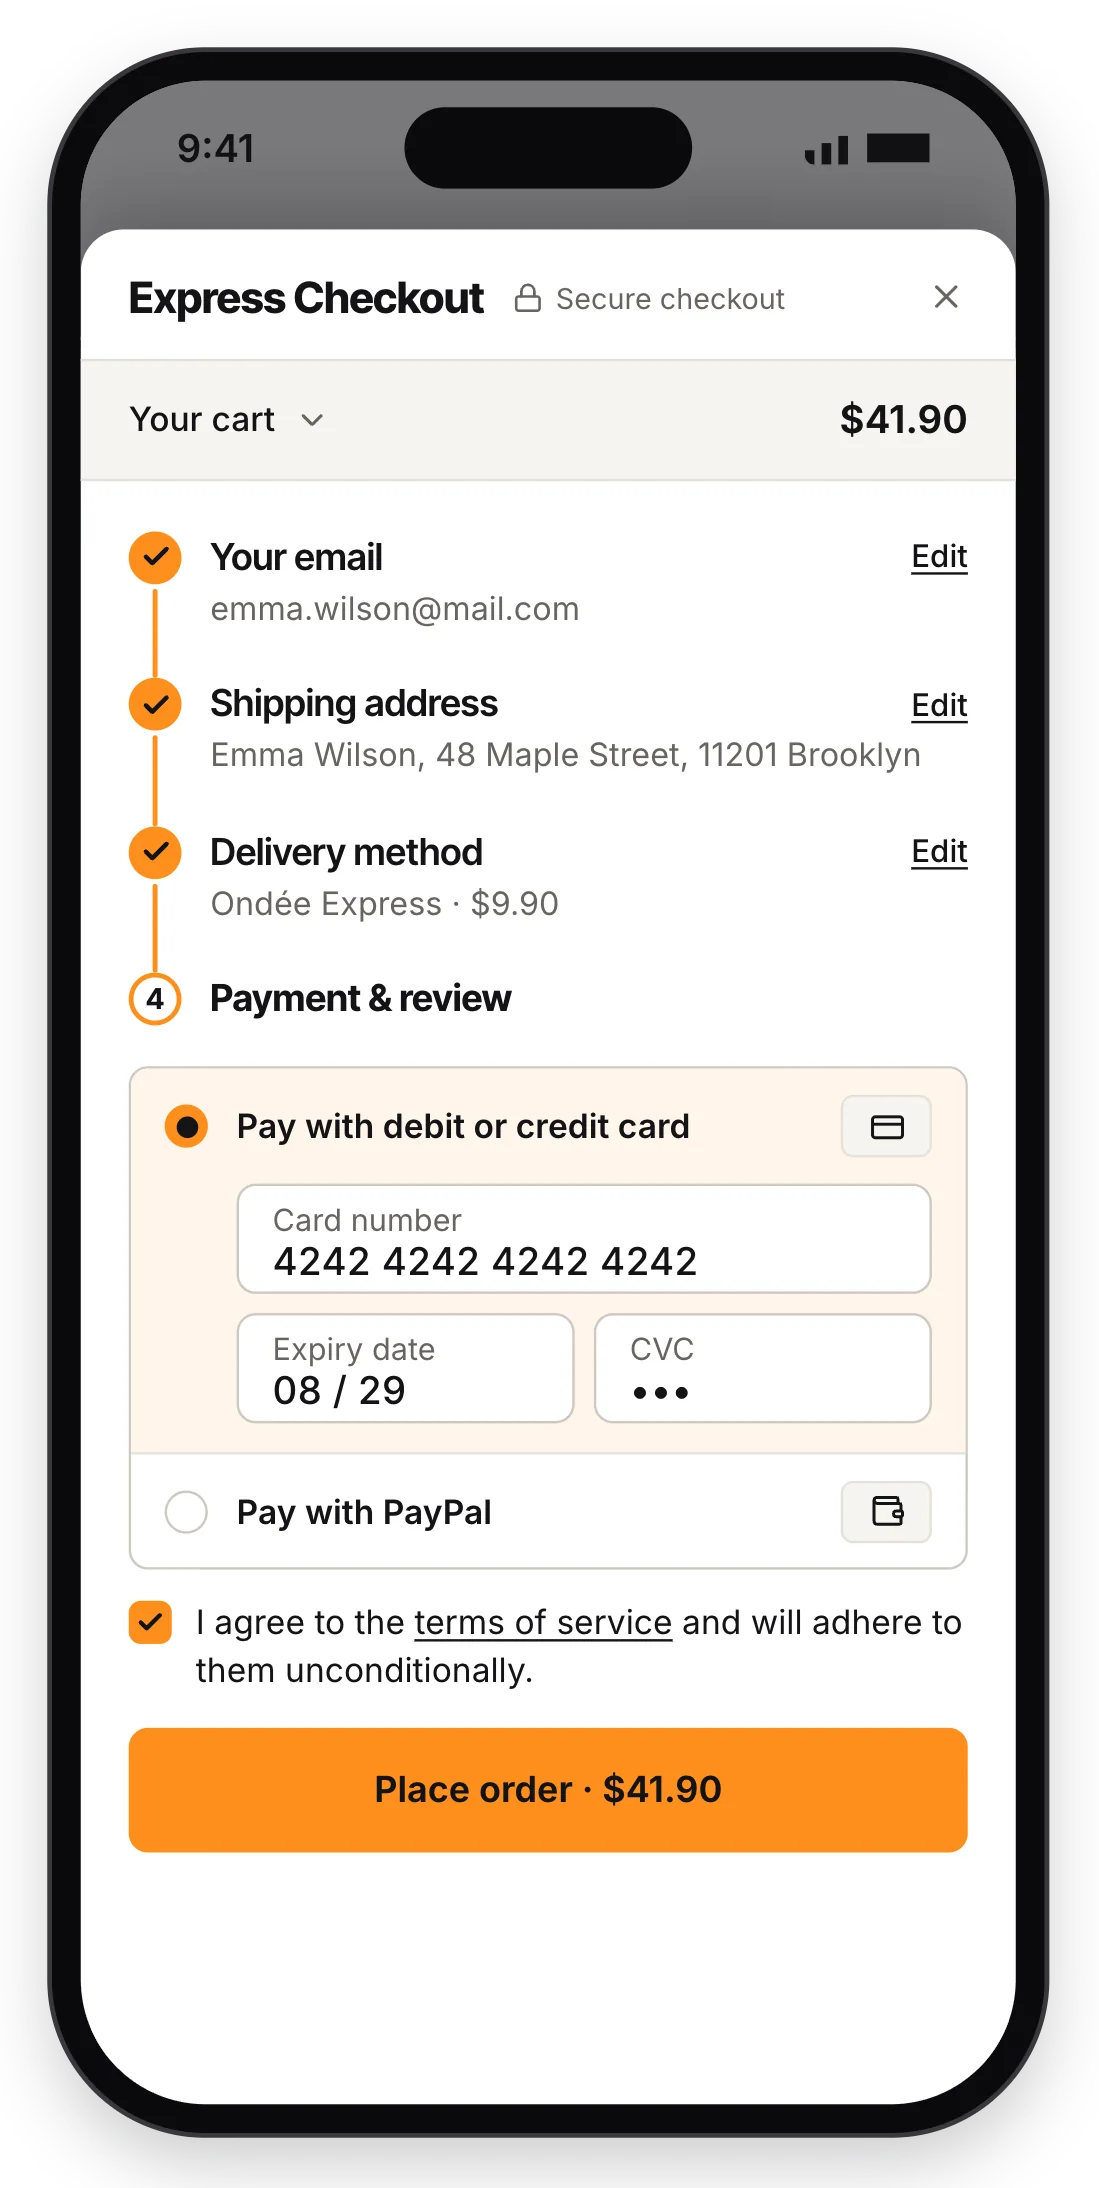
On screens narrower than 768 px the window becomes a sheet that covers the page, made for a thumb:
- The steps take the full width of the screen.
- The cart folds into one bar at the top, "Your cart" with the total. A tap opens it, with the same quantity, remove and promo code controls.
- Buttons and fields are taller and easier to tap.
There is nothing to set up for phones. The width and corner settings of the Design tab apply to larger screens only; the accent color applies everywhere.
5General Settings
General Settings
Who sees the quick checkout, where its button goes, what else opens it, which consent boxes it shows, and what is recorded. Six short sections, in the order of the page.
5.1 Availability
Choose who can see the quick checkout on your shop.
Live mode
- On. Every visitor sees the button and can use the window. This is the normal state of a shop in business.
- Off. Only visitors whose IP address is in the list below see it. For everyone else your shop looks as if the module were not installed. Use this while you set things up or test payments.
Allowed IP addresses
- One address per line, or separated by commas.
- A range of IPv4 addresses can be written in CIDR form, for example
192.168.0.0/24. - Add my IP adds the address you are connected from. The address the module detected is shown next to the button.
203.0.113.245.2 Buy now button
Where the button and the checkout window are added to your theme.
Buy now button position
The place of the Express Checkout button on the product page.
- Product Additional Info. The area most themes show right under Add to cart. Start here.
- Product Footer. Lower on the product page, under the description. The exact place depends on your theme.
- Custom hook (manual insertion). You decide the exact place by adding one line to a template of your theme. The page shows the line with a copy button:
Paste it into your theme's product template where the button should appear. If you are not used to editing theme files, ask the person who maintains your theme.
Modal injection hook
The checkout window has to be added to your pages, out of sight, so it is ready when the button is clicked. This setting chooses where.
- Footer. Works with most themes. Keep it unless you have a problem.
- Header. For themes whose footer is replaced by a page builder (Creative Elements and similar), where the footer position is not shown.
When to change it: if the button is there but nothing opens when you click it, switch to Header.
5.3 Open triggers
Other ways to open the quick checkout with the current cart, without the product page button.
Open quick checkout with URL hash
Any link to your shop that ends with this text opens the window as soon as the page loads, for example https://your-shop.com/#quickcheckout. Use it in a banner, an email or a menu link.
- Use letters, digits, hyphens or underscores. Spaces and special characters would never match, and the page tells you so.
- Leave the field empty to switch this off.
Open quick checkout on click (CSS selector)
Turns buttons or links of your theme into "open the checkout" buttons. Every element that matches this selector opens the window when clicked.
- With the default value, give any button or link the class
hiqc-open-quickcheckout. - Or enter the selector of an element your theme already has. The page warns you if the selector is not valid.
- Leave the field empty to switch this off.
Open quick checkout when clicking the cart icon
When on, a click on the cart icon in your header opens the quick checkout and no longer goes to the cart page.
Cart icon selector
Tells the module which element of your header is the cart icon. The default value, #_desktop_cart .header a, .blockcart a, fits PrestaShop's standard themes.
- If a click on your cart icon still opens the cart page, your theme builds its header differently: ask your theme's developer for the right selector.
- With the field empty, the cart icon keeps opening the cart page even when the option is on.
.name points to elements with the class "name", #name to the element with that id. If this is new to you, keep the default values. They work without any change to your theme.5.4 Consent checkboxes
The checkboxes shown to customers at step 1, under the email.
Show GDPR / privacy consent checkbox
Shows a privacy consent box that the customer must tick before continuing. Without it, the window reminds them: "Please accept the privacy policy to continue."
The wording. If PrestaShop's official GDPR module is active on your shop, the box uses the consent message you wrote there for account creation, with your link to the privacy policy. Otherwise it reads: "I agree to the processing of my personal data in accordance with the privacy policy."
Show "Subscribe to our newsletter" checkbox
An optional box. When the customer ticks it, they are marked as a newsletter subscriber in their customer record, as if they had subscribed while creating an account.
Show "Receive offers from our partners" checkbox
An optional box that saves the customer's consent to partner offers in their customer record. Switch it on only if your business really sends such offers.
5.5 Statistics
What the module records for the Statistics tab.
Collect usage statistics
Records how shoppers use the quick checkout: the steps they reach, how they opened the window, the type of device, the payment method they tried, and the cart and order numbers.
No personal data is stored: no names, no emails, no addresses and no IP addresses.
When you switch it off, new checkouts are no longer recorded. What was recorded before stays visible in the Statistics tab.
Keep problem details for
How long the module keeps the detailed records behind the "Where shoppers get stuck" report (field errors, log-in requests, failed payments). Choose 90 days, 6 months or 12 months.
- Older details are deleted automatically, once a day. There is nothing to schedule.
- Checkouts, orders, revenue and the funnel are always kept for two years, whatever you choose here.
5.6 Uninstall
Clean data on uninstall
Off (recommended): settings and statistics stay in the database when you uninstall, and come back if you install the module again. On: they are deleted when you uninstall. Use it only when you remove the module for good.
6Design Settings
Design Settings
Make the checkout look like part of your shop: one accent color, four sliders, and a preview that follows every change before you save.
6.1 Colors
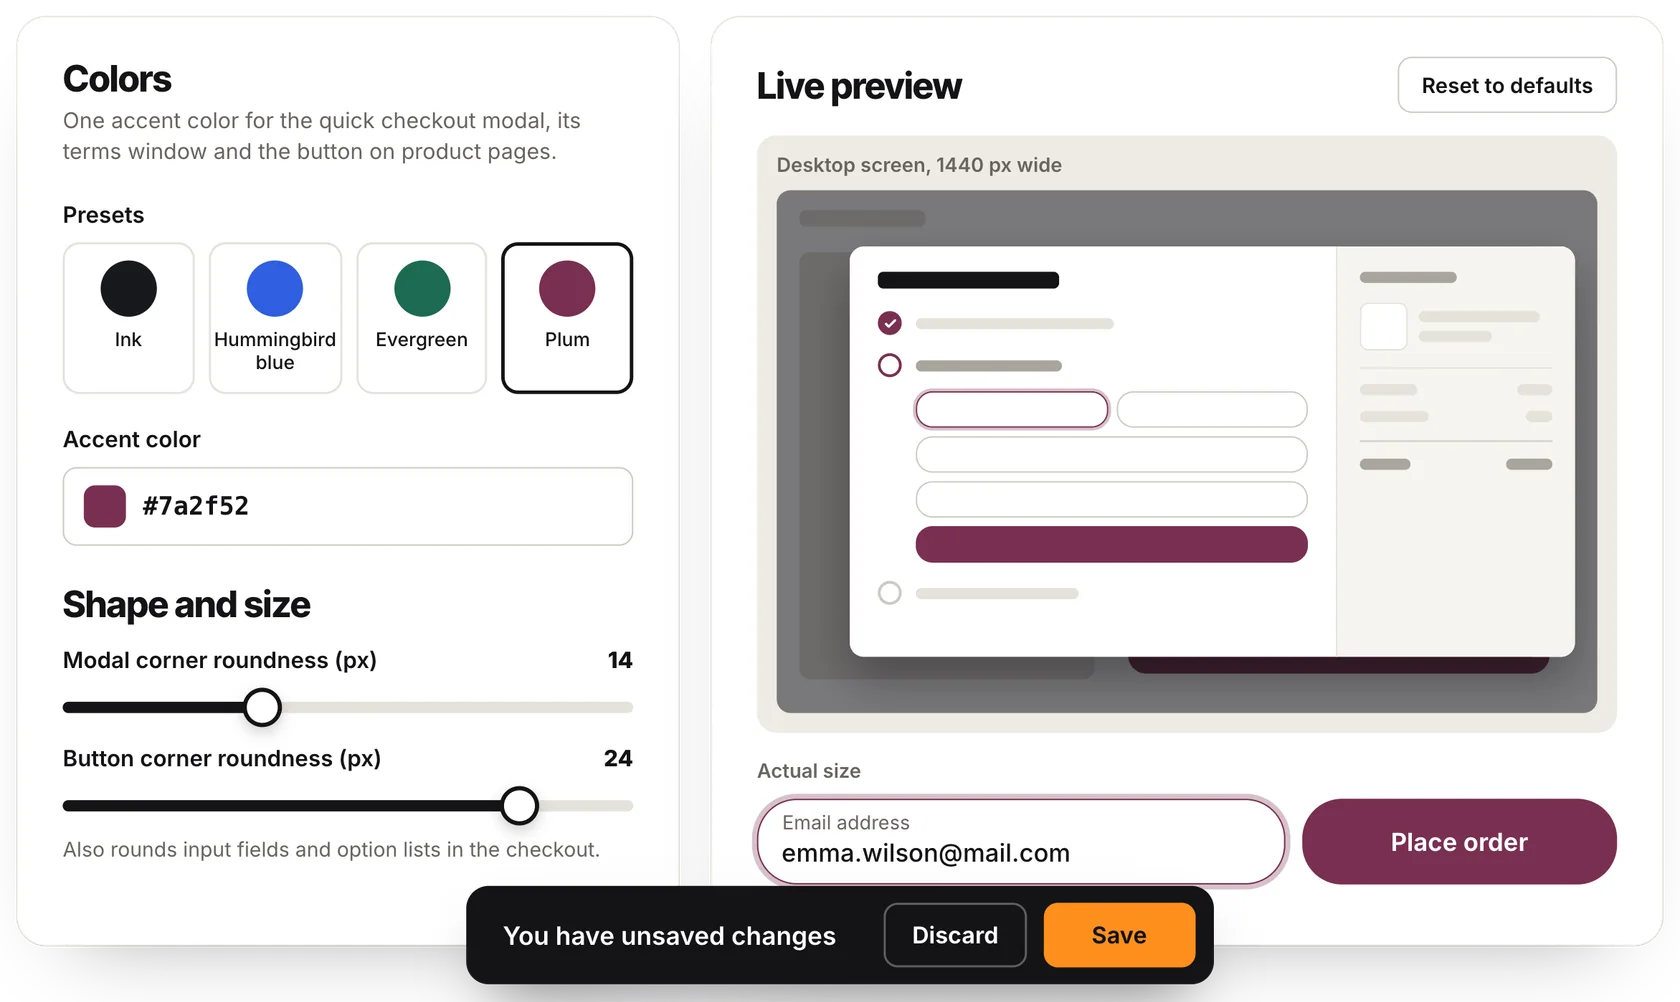
The checkout uses a single accent color. It colors the Express Checkout button on product pages, the buttons of the window, its radio buttons, checkboxes, step markers and the outline of the field being filled in.
Presets
Four ready-made colors. A click fills in the accent color below, where you can still adjust it.
| Ink | #17191c | The default, a near black. |
| Hummingbird blue | #2f5fe0 | A bright blue. |
| Evergreen | #1d6b52 | A deep green. |
| Plum | #7a2f52 | A dark red-violet. |
Accent color
Pick any color, or type it as a hex value such as #2f5fe0. Your shop's main brand color is usually the best choice.
You do not have to choose a text color. The text on buttons turns white on dark colors and dark on light colors by itself, so it always stays readable.
6.2 Shape and size
Four sliders. The width and the corners of the window apply on screens from 768 px wide; on phones the window always opens as a full-width sheet.
| Setting | What it changes | Range | Default |
|---|---|---|---|
| Modal width (px) | How wide the window can be on desktop screens. Narrower feels more focused; wider leaves more room for long addresses and many payment methods. | 720 to 1400 | 940 |
| Modal corner roundness (px) | The corners of the window, from square (0) to very round. | 0 to 40 | 14 |
| Button corner roundness (px) | The corners of the buttons. The input fields and the option lists of the checkout follow the same value. Match it to your theme's buttons. | 0 to 30 | 8 |
| Backdrop darkness (%) | How dark the page becomes behind the window. Higher puts more focus on the checkout; lower keeps the page visible. | 0 to 90 | 56 |
6.3 Live preview
The right side of the tab shows a simplified drawing of your product page with the window open on it, on a desktop screen 1440 px wide. It follows every change at once, so you can judge the width, the corners, the color and the darkness together. Under it, Actual size shows a field and a button exactly as large as they will be on your shop.
- Nothing you try here is visible to customers until you click Save. Discard goes back to the saved design.
- Reset to defaults loads the built-in look into the form. It too reaches your shop only when you save.
6.4 Advanced: custom CSS
An optional box for your own CSS rules. Most shops can leave it empty.
- Your rules are loaded after the design settings, so they can override them. Write CSS rules only, up to 20,000 characters (counted under the box);
<style>and<script>tags are not accepted. - Custom CSS is not applied to the live preview. Check the result on your shop, on a computer and on a phone.
7Statistics
Statistics
How many shoppers open the quick checkout, how far they get, what stops them, and the orders and revenue it brings, compared with the period before.
7.1 Three words to know first
| A checkout | One shopper's journey through the window, from the moment they open it. Closing the window and opening it again a little later continues the same checkout; it is not counted twice. |
| Express order | An order placed with the Place order button of the quick checkout. These are the orders the module brings in directly. |
| Assisted order | The cart went through the quick checkout, but the customer finished the order on your standard checkout page. The module helped; the order was placed elsewhere. |
7.2 Period, filters and refresh
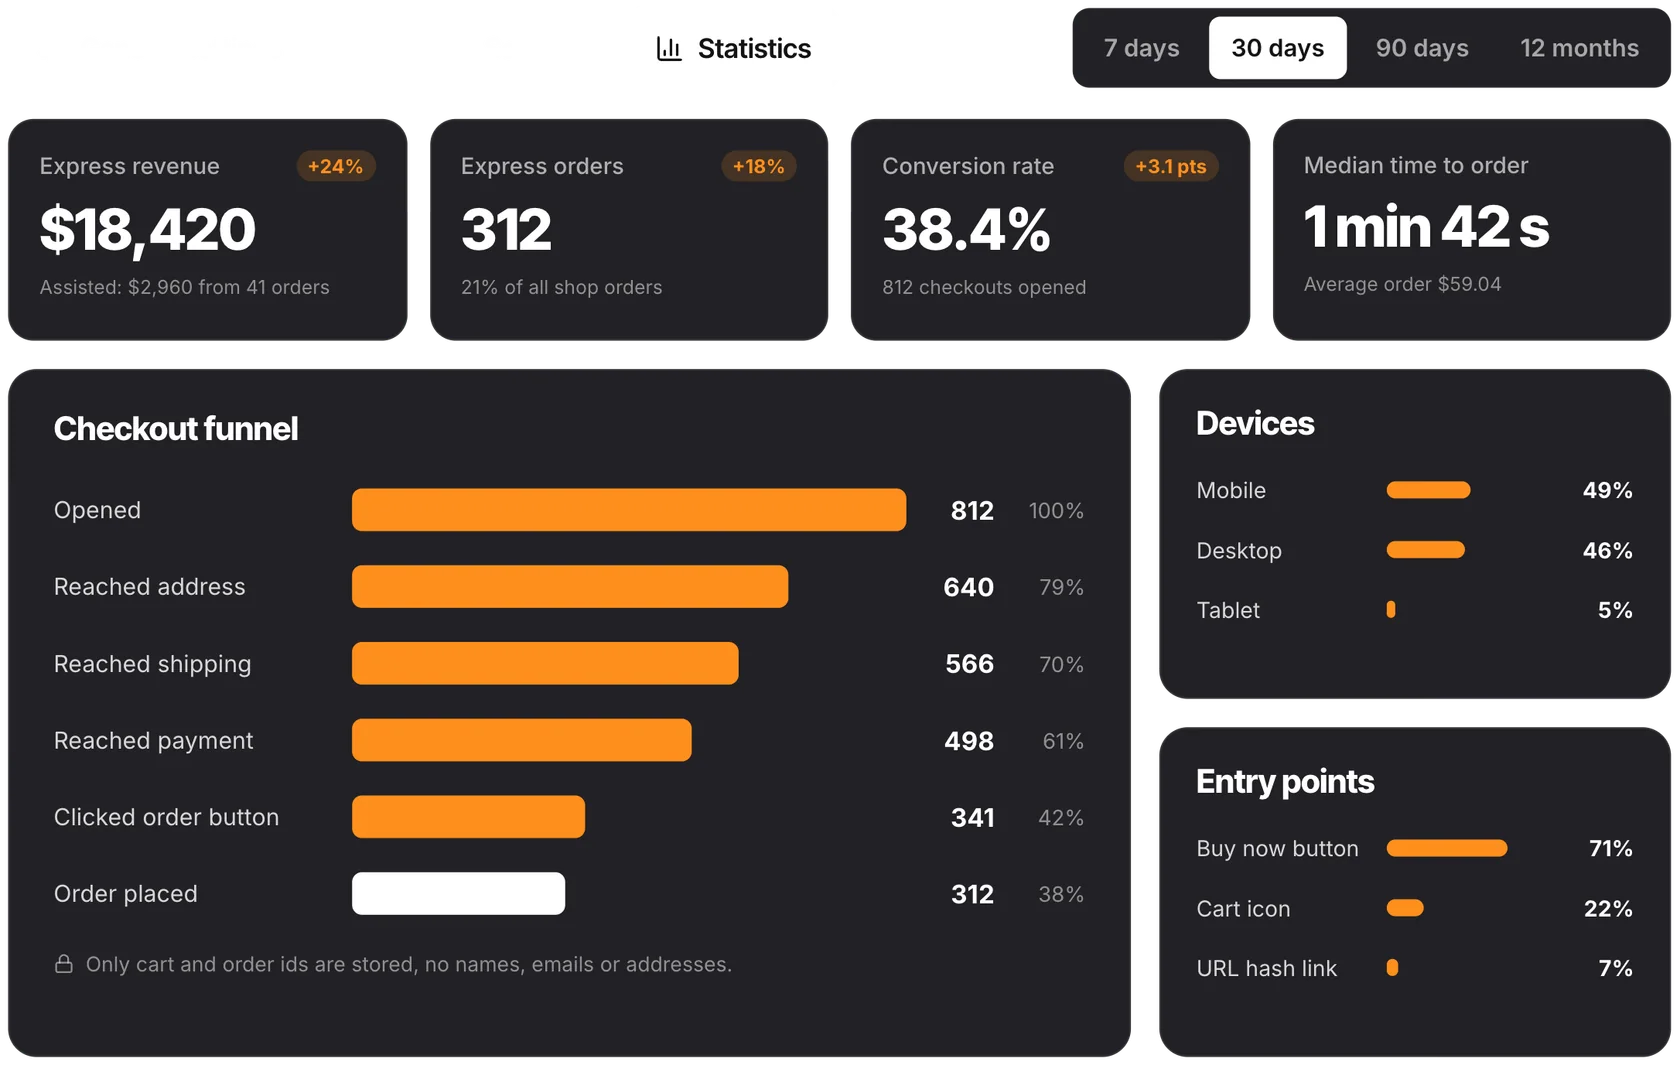
- Period. 7 days, 30 days, 90 days or 12 months. Your choice is remembered in your browser. Every figure is compared with the period of the same length just before.
- Filters. Narrow the whole page by Device (desktop, tablet, mobile), Entry point (Buy now button, URL hash link, custom selector, cart icon) and Customer (guest, logged in, logged in at checkout). Clear filters removes them.
- Refresh. The round arrow reloads the numbers.
- Status. At the top left, "Collecting since" with the date of the first recorded checkout, or "Collection paused" when statistics are switched off.
7.3 The four headline figures
| Figure | What it tells you |
|---|---|
| Express revenue | The total of the express orders, tax included, in your shop's default currency. Cancelled, refunded and failed orders are left out. Under it: the revenue and number of assisted orders. |
| Express orders | How many orders were placed in the quick checkout, and their share of all your shop's orders in the period. |
| Conversion rate | The share of opened checkouts that ended in an express order. Under it: how many checkouts were opened. |
| Median time to order | Half of the express orders were placed faster than this, counted from the moment the window opened. Under it: the average express order next to your shop's average order. |
Each figure carries a small badge with its change against the previous period, in green when it moved the right way and in red when it did not. For the conversion rate the change is given in percentage points ("pts").
7.4 Checkout funnel and devices
The funnel shows how far shoppers get after opening the window. Each bar counts the checkouts that reached that stage, with their share of all opened checkouts and the drop since the stage before:
| Stage | The shopper… |
|---|---|
| Opened | opened the quick checkout. |
| Reached address | gave an email (or was logged in) and arrived at the address step. |
| Reached shipping | confirmed an address and arrived at the delivery step. |
| Reached payment | chose a carrier and arrived at the payment step. |
| Clicked order button | clicked Place order. |
| Order placed | completed the payment: the order exists. |
The stage with the biggest loss is where a change is most likely to pay off. Beside the funnel, Devices shows the share of checkouts on desktop, mobile and tablet, each with its own conversion rate.
7.5 What stands out
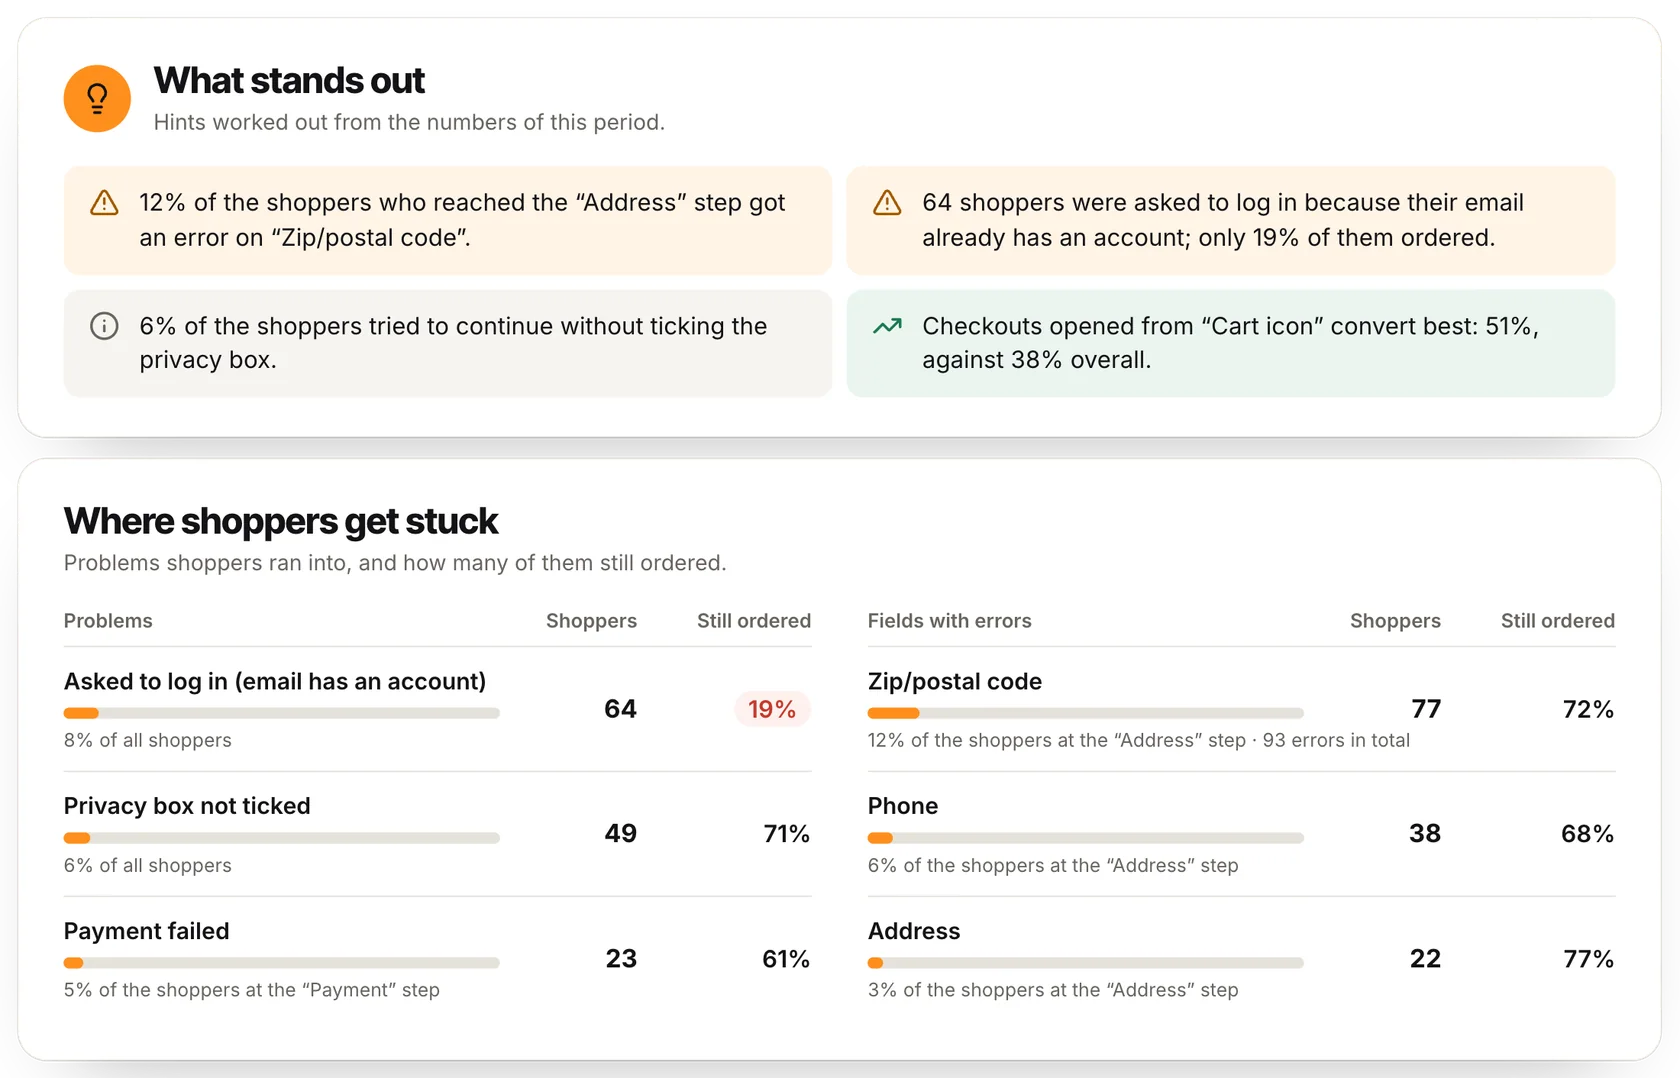
A short list of hints the module works out from the numbers of the period, in plain sentences, the most serious first. They appear once the period has at least 20 checkouts, and there are never more than four. A hint can tell you that:
- a payment method fails often inside the checkout (place a test order with it, or check its module's settings);
- one type of device converts far worse than another (try the checkout on that device yourself);
- shoppers who are asked to log in because their email has an account rarely order;
- one field of a form causes errors for many shoppers;
- shoppers often try to continue without ticking the privacy box;
- more orders were finished on the standard checkout than in the quick checkout;
- one entry point converts clearly better than the others.
7.6 Where shoppers get stuck
Two lists of the difficulties shoppers ran into, each with the number of shoppers concerned and how many of them still ordered, in the quick checkout or on the standard checkout. A low "still ordered" rate, shown in red, means the problem is costing you orders.
| Problem | What happened |
|---|---|
| Asked to log in (email has an account) | The email typed at step 1 belongs to an existing account. |
| Login failed | A wrong password in the window's log-in form. |
| Privacy box not ticked | The shopper tried to continue without the privacy consent. |
| Address could not be saved | The address form was refused. |
| Shipping method could not be saved | The chosen carrier was refused or incomplete. |
| Payment failed | The payment did not go through inside the quick checkout. |
| Payment method could not start | The chosen payment method cannot run in the window (see Payment methods). |
| Voucher code rejected | A promo code was not accepted. |
| Stock or quantity warning | The shopper asked for more than is in stock. |
| Server error | A technical error on the shop's side. |
Fields with errors lists the form fields that were refused most often (postcode, phone, address…), with the share of shoppers at that step who got the error.
7.7 The other reports
| Report | What it shows |
|---|---|
| Checkouts and orders | A bar per day (per week for 12 months): the checkouts opened, with the part that ended in an express order in a darker tone. |
| Entry points | For each way of opening the window (Buy now button, URL hash link, custom selector, cart icon): checkouts opened, orders, conversion and revenue. |
| Payment methods | For each payment method: order attempts from the quick checkout, how many failed, orders and revenue. A red badge marks a method where one attempt in ten or more fails. |
| Top products | The ten products whose button opened the checkout most often, with orders, conversion and revenue. The revenue is the total of those orders, which can include other products. |
| Recent express orders | The ten latest orders placed in the quick checkout: reference and date (a link to the order), customer name and type, payment method, entry point, time to order, total and status. |
7.8 Your data
- Privacy. Only cart and order numbers are stored with the statistics. No names, emails, addresses or IP addresses.
- Test checkouts. Checkouts made while live mode was off are not counted. When there are some, a line tells you how many were left out.
- Before the first checkout. The tab shows "Statistics show up after the first checkout".
- Collection off. A notice says "Statistics collection is off", with a button to open the settings. The numbers then only cover the time collection was on.
- Reset statistics. The button at the bottom of the tab deletes all recorded checkouts of the shop you are editing, after a confirmation. Your orders are not affected. This cannot be undone.
8Payments and carriers
Payments and carriers
Express Checkout does not come with its own payment or delivery methods. It shows the ones your shop already uses, with your prices and your rules.
8.1 Payment methods
The payment step lists the payment methods your shop offers for the cart, the same ones as on your normal checkout. How a payment is completed depends on its module:
| Payment module | In the quick checkout |
|---|---|
| PrestaShop Checkout | PayPal and card payments are completed inside the window. The module must be set up and able to receive payments. |
| Stripe (official module) | The card form is shown inside the window, when the "Integrated payment form" option is on in the Stripe module's settings. |
| Modules with a standard payment button | Methods that confirm the order with a simple button or send the customer to a payment page work as on your normal checkout: after Place order, the module takes over. |
| Other modules | A few payment modules need the full checkout page to work. For those, the window says "This payment method cannot be completed in quick checkout. Please continue on the checkout page." and shows a Go to checkout button. The cart, the address and the carrier are already filled in there. |
8.2 Carriers and delivery
- The delivery step shows the carriers PrestaShop offers for the customer's address and cart, with your prices, your free shipping thresholds and your delivery times.
- Carrier modules can add their own content under their option (a pickup point selector, for example) and can require it to be completed before the customer continues.
- Carts with only virtual products skip the delivery step.
8.3 What comes from your shop's settings
The checkout follows the rules already set in your back office. To change one of these, change it in PrestaShop, not in the module:
| In the checkout | Comes from |
|---|---|
| Address fields and their order | The address format of each country. |
| Required address fields | The required fields set for customer addresses, plus the postcode and state rules of each country. |
| List of countries | The countries that are active on your shop. |
| Terms of service checkbox | Your shop's order settings. It is shown when your normal checkout asks for it. |
| Promo codes | Your cart rules. The promo code field is shown when vouchers are in use. |
| Stock limits | Each product's stock and its setting for orders when out of stock. |
| Prices, taxes and totals | PrestaShop's own cart calculation, in the customer's currency. |
| Privacy consent text | PrestaShop's official GDPR module, when it is active. |
8.4 Changing the texts
Every text of the checkout window and of the configuration page can be changed or translated with PrestaShop's translation tool: go to International > Translations, choose to modify the translations of installed modules, and select "Express Checkout" and your language. The module already comes in several languages.
9Troubleshooting
Questions and answers
The situations merchants meet most often, and where to look first.
9.1 The button and the window
| What you see | What to check |
|---|---|
| The button is not on the product page |
|
| The button is greyed out | The product, or the selected combination, cannot be ordered: it is out of stock and does not accept orders when out of stock, or it is not available for order. |
| Nothing happens when I click the button | Set Modal injection hook to Header. Themes built with a page builder often replace the footer where the window is normally added. |
| Nobody sees the button, me included | Live mode is off and the list of allowed IP addresses is empty. Add your IP address or turn live mode on. |
| The cart icon still opens the cart page | Check that the option is on and that Cart icon selector is not empty. If your theme has its own header, the default selector may not match it: ask your theme's developer for the right one. |
My #quickcheckout link does nothing | The end of the link must be exactly the value of the setting, with no spaces or special characters. If the window opens and says "Your cart is empty", the link works: the visitor's cart simply has no products. |
9.2 During the checkout
| What you see | What to check |
|---|---|
| A customer is asked to log in | Their email already has an account on your shop. They can log in, reset their password, or use another email address. This protects existing accounts and is not a setting. |
| "This payment method cannot be completed in quick checkout" | That payment module needs the full checkout page. The customer continues with Go to checkout. See Payment methods. |
| No payment method is listed | The window shows "Unfortunately, there are no payment methods available for your cart." Check your payment modules' restrictions by country, currency, carrier and customer group, as for your normal checkout. |
| A carrier is missing | The window offers the carriers PrestaShop allows for that address and cart. Check the carrier's zones, ranges and group restrictions. |
| A field I do not need is required | Required fields come from PrestaShop's address settings and from each country (postcode, state, identification number), not from the module. |
| "Your session has expired" | The page was open for too long. Reloading it is enough. |
9.3 In the back office
| What you see | What to check |
|---|---|
| "Please select a specific shop to configure this module." | On a multistore, choose one shop in the shop selector, not "All shops" or a group. |
| The Save button refuses my settings | A field has a value that cannot be saved; it is highlighted with the reason. Text fields accept at most 255 characters and no < character; the IP list accepts IP addresses only. |
| My design change is not on the shop | Did you click Save? Then reload the product page; if needed, clear your shop's cache and your browser's. |
| My custom CSS does not show in the preview | That is expected: custom CSS is applied on your shop only. |
| The Statistics tab is empty | Numbers appear after the first real checkout. Checkouts made while live mode is off are not counted, and nothing is recorded while Collect usage statistics is off. |
| "Where shoppers get stuck" covers less time than the rest | Its details are kept for the time set in Keep problem details for. |
9.4 Support
If your question is not answered here, we are glad to help.
- From the module. Open the menu of the module's bar (the button with three dots, at the top right of the configuration page) and click Contact us. The same link is at the bottom of every help panel.
- From PrestaShop Addons. Open your Addons account, find Express Checkout in your orders and contact the developer from there.
To get a quick and useful answer, tell us your PrestaShop version, your theme, the module's version (shown next to its name on the configuration page), and what you did just before the problem appeared. A screenshot helps a lot.